Exploring Web 2.0 For The Classroom

When I first signed up for this class I expected just to learn a bunch of tools such as Twitter, TimeToast, Google Docs, etc. I was pretty excited about finding more to use for secondary social studies but I was also hoping we got into some deeper technology. I ended up learning a lot! I love technology classes because it is SO important to use technology in the classroom now. Kids are attached to technology like its a life source, so what better way to keep them engaged in school? I can’t think of any. I would have loved to use technology when I was in high school…it just makes learning more fun and interesting. For social studies, many students find it boring, which makes me sad. But who can blame them when some teachers will just lecture to them and make them memorize facts and dates? By integrating technology into my classroom I hope to make learning actually fun for my students.

My favorite aspect of this class was learning how to make podcasts and enhanced podcasts. I love the idea of using this in the classroom. There is so much information about social studies and when we are in the classroom we are crunched for time so we can’t cover everything. This is a great tool to extend the learning at home. Also, it’s great for a little extra help! My favorite idea for these is using them in a flipped classroom. I think the idea of flipping the classroom is very interesting and seems to work. Rather than just reading at home, students can watch an enhanced podcast or listen to a podcast to learn the information. A lot of students have trouble reading textbooks. 

Image

I also really like QR codes, it was a quick lesson but that was all that was needed. I never had any idea what these codes exactly were and what the point of them was. So I was amazed at how awesome they are! I think they are great for providing online worksheets and activities. You can put almost everything into a code. I plan on using them to provide extra help if students need it by placing one on the bottom of printed notes or assignments. These codes can take them to videos, help pages, definitions, and so much more.

I really enjoyed this class but there were some aspects that I didn’t like. One thing I didn’t like was learning about Twitter. I’m pretty sure everyone knows Twitter very well. I did enjoy the video that was shown and I think just showing that video would all that was necessary. Another aspect of the class that made it difficult was obviously that it was crunched into a month’s time. It was very hard to understand what exactly we were supposed to do and when it would be due. I got confused often. The rubrics were nice and helpful, but I think adding clear directions and especially a due date would help. I also felt the class could have been a little more time efficient. A lot of time was spend heavily explaining a project or topic when it really wasn’t necessary. I think it would be better to explain the basics and if some students need more help they could get it. But thats just my opinion…I’m a pretty fast worker with technology and honestly I’m glued to technology almost all day so much of it was easy to figure out myself.

I felt as though our teacher was very knowledgable about the subject and had a bunch of great ideas of how to use everything in the classroom. It was so helpful that for everything we did in the class she would think of ways you could use it in every subject. Some times it is very hard to recognize the potential of a tool on your own. Overall, I really enjoyed this class and I plan on continuing to learn more about technology that is useful in the classroom! I will definitely by using my Google Reader!

For my technology class, we had to research, learn to use, and create an artifact of another Web 2.0 tool. We chose to do Google Earth, which is a web-based tool that is downloadable onto your computer that allows you to explore the Earth, Moon, Mars and the Sky in many different ways. Since my partner and I are going to be secondary social studies teachers, we thought this would be a great tool to learn how to use. I had played around with it before but never with the idea of using it in a classroom setting. I had just searched around looking for past houses and towns I had lived in. It sure is great to remember a place you used to live!

Google Earth is definitely amazing and is the top of its class, but it is nowhere near perfect and takes time to figure out. Google is very helpful with learning how to use this application. There are many forums, guides, examples and tips that are easily accessible through the program itself or by Google Search. I was pretty disappointed with the program not being user friendly. I had to search how to do things many times just to make a simple tour. Now that I know how it is somewhat easier but it just didn’t turn out that great. The 3D view is my favorite. It is so cool that you can explore different places as if you were walking down the street. Although, you must be careful because it is just as easy to get lost in Google Earth as if you were there in person! Hopefully you have a good sense of direction. Another really annoying thing was that the program would randomly shut down and you would lose your work…big bummer. I hope soon in the future Google perfects this wonderful application!

There is a limitless number of things you can do with Google Earth in the classroom. Just by doing some quick research I found a bunch of great ideas! The only problem is it’s a lot harder than you think to actually use them. But, once I become comfortable with Google Earth, I will definitely use it in my classroom. It works wonders for social studies lessons. For a government class, we could explore Washington DC. For a history class, students could explore how places they learn about look today. And obviously Google Earth is great for geography classes. I would have to spend a lot of time to actually figure out what and how I wanted to use it in class. I think students would really enjoy exploring on their own and not just watching what the teacher did. A great idea is to create a scavenger hunt and have the kids explore to find everything. Overall, even though it’s difficult, Google Earth is a great tool to use to integrate technology into the classroom.

I found these sites below to be helpful for ideas and tips:

Google Earth Blog

Google Earth by Google –> this site has some issues, such as missing pages, but it is still helpful.

__________________________________________________________________________

Below is the artifact I made on Kerpoof, which is a drawing site for kids:

An enhanced podcast adds images to your audio. You can also make a vodcast, which adds video to you audio. Before we did this project, I had used iMovie to make a movie and I had used Audacity to make a podcast, but I never thought of putting the two together. I hadn’t heard of a enhanced podcast before, even though I had seen them on iTunes. I guess I just didn’t even know what I was looking at. But, I’m glad I have learned about them now. I like them a lot more than a basic podcast. It adds so much more to your production to have images and/or videos included. I find it hard to stay engaged with a podcast, but I am more engaged with an enhanced podcast.

I loved making an enhanced podcast, but it definitely wasn’t the easiest thing to do! I do believe with more practice it would become a lot easier. First, I chose my topic…I decided to do my enhanced podcast about East Tennessee during the Civil War. I chose this topic because I find it very interesting due to much of it being unknown by many people and I believe it is important to make lessons authentic for the students. The Civil War can be boring, so if I’m teaching in Tennessee this topic could be interesting to my students and allow them to find a connection with it. Second, I found my images for it. I used Wikimedia via Wikipedia. Obviously, Wikipedia contains a massive amount of information about history. When I was looking up some information, I realized that it also had great historical pictures, which are located on Wikimedia and are mostly in the public domain. Perfect! The only downside to Wikimedia is that it is hard to search for images. Nothing came up even when I searched “Civil War”! So I would find a page on Wikipedia and see if there was any pictures I wanted to use. But, it ended up working well. I also found a video I wanted to use; it was a reenactment of the Battle of Fort Sanders. I was only able to use about 10 seconds of this video due to copyright but it was just the right amount! Next, I storyboarded my enhanced podcast. This was a very good idea, but it only helped me a little bit. I think it would have helped much more if I had recorded my audio before I did it. I had to change around the order of my picture so many times and had to find more pictures. Recording my audio in Audacity and placing the pictures in iMovie was the easy part. But I did have many issues. The major issue was aligning my pictures, voice track, and audio track how I wanted it. The audio track wouldn’t upload in full to iMovie unless the timing was long enough…so I had to do this about ten times to get the audio perfect. It was very difficult to get the pictures with the audio, but as stated before, I think it would be easier if I recorded my voice and got my music first. I also had a difficult time finding the music I wanted! I may just be picky but it was difficult to find Civil War style music that didn’t have voice along with it. I kept finding instrumental tracks but they were intense battle tracks that you would hear behind a huge battle on TV. But, I finally found a good one and I used a vocal track, actually from the Civil War era, to play with my credits. I really liked this. I also had the same problem that I had last time with Audacity; it took me multiple times to get the music to export with the voice track. It drove me crazy! I spent a very long time on this project but I really liked the end result.

I would definitely use enhanced podcast in the classroom. I think it is more interesting than a podcast for students. I could use it for my flipped classroom idea or as a helpful reminder for students studying at home. I also think it would be good to use to accompany a lecture. Lectures obviously can get very boring and I think an enhanced podcast would help make it more interesting. Also, it might be possible to have students do an enhanced podcast. They would need a lot of guidance and I wouldn’t be able to hold the video/audio quality to very high standards, but I think students would have fun making it and being able to present information in this way. The only problem I see with using it in the classroom is that it is time consuming and can be difficult to use. But, overall I think its a great resource to use.

Below is my enhanced podcast, uploaded to YouTube. Enjoy!

QR codes…who knew they would be so fun to use in the classroom? I had no idea, I really had only seen them before and wondered what you could actually do with them. I think I tried to pull one up once when someone downloaded a QR reader to my phone but after that the app just sat hidden in my iPhone until class the other day. When I saw we were learning about them I questioned how would I be able to use these in my classroom. But, it turns out there are so many things you can do with a QR code! And there are many websites and tools that make creating your own code simple. You can basically link anything to a QR code.

QR codes are basically a barcode on steroids. It is 3-deminsional code that allows you to fit in more information. You can use one for business cards, resumes, URLs, pictures, websites, overviews, and the list goes on and on. Also, you can place them on anything you can print or paste something to. This person got creative and placed one on a coffee mug!

In class, we created QR codes to contain information about ourselves. To read the codes we created, we downloaded the iPhone app Qrafter. It was very easy to use and read codes in a matter of seconds! You can also make a code with this app, which I want to try eventually. We created out codes at this site, which was also very simple. One thing I really like about QR codes is how easy they are to create. I never knew you could create them on your own because they look so complex! Below is the “me-card” I made in class. If you open it on an iPhone, it brings you directly to a page with my information and allows you to save it to your phone.

I think the amount of things you can do with QR codes in the classroom is unlimited. It really depends on how creative you are. I think the best thing about them is how simple they are to incorporate and they will definitely make whatever you are doing more interesting and engaging for the students. I think about how to use them in the classroom and the first thing that pops into my head is a scavenger hunt. One way you could do this is by printing out a scavenger hunt assignment sheet and then have QR codes all over the classroom with websites that have the answers to the hunt’s questions. This would get the students out of their seats and I would have them working with partners or groups. I believe having students find information on their own is the best way for them to learn and this is a great way to do this. It could also be a good way for students to “meet” each other on the first day. They could make a form of “me-cards”, I would want them to have interesting facts about themselves included, and then post them around the room (like we did in class) and maybe try to match the person to the QR code or just learn about each other. I’m sure I could think of many more ways to use QR codes in the classroom and I believe I will incorporate these into my teaching at some point. I really like QR codes!

podcast

I have officially completed my fist podcast…yay! We uploaded our podcasts to iTunesU and created them with Audacity. We were able to save them as MP3s through Audacity by using LAME. The only one of these programs that I have had any experience with before is iTunesU. I had a teacher last summer in my Geography 101 class that uploaded his lectures to iTunesU as podcasts. This was great to have for studying and catching up if someone missed a class. He used some kind of recorder device. It actually worked very well because it even slightly picked up on questions that other students would ask. I have also downloaded some podcasts on my iPhone that are open to the public, such as TED Talks.

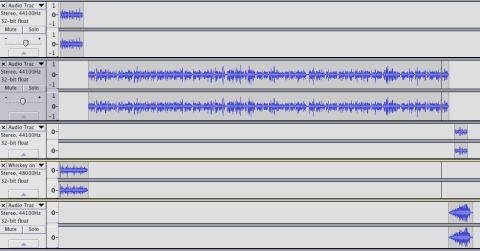
I think podcasts could be very useful in the classroom and for personal use. I downloaded Audacity on my MacBook and was able to record my audio just by speaking into my computer, no headset needed! It was very easy to record this way and I though Audacity was very useful for this aspect. Below is a screenshot of my podcast on audacity.

One idea I recently thought of for podcasts in the classroom is to use them to “flip the classroom.” The idea of flipping the classroom is that students will learn/read/listen to the lecture part of the course at home for homework and while they are in the classroom students will work on projects or worksheets, etc. This is proven to help many students because it allows the teacher to differentiate instruction more efficiently and spend more time helping students in the classroom instead of lecturing.

Links for Flipped Classroom sites:

Huffington Post: Flipped Classroom

Educational Vodcasting

The tool I was assigned to learn about in my summer technology class is called Tagxedo. It is a tool that allows you to make a word cloud/picture out of any text, similar to Wordle. I really enjoyed this tool. I haven’t had any experience with the tool before but it reminded me a lot of Wordle, but I feel like it allows you to do so much more than Wordle.

Overall, I think Tagxedo is a very useful tool. I like that you are able to use any picture of your choosing, while there are also many pre-set choices. One thing I didn’t find useful on Tagxedo was that you are unable to edit the sizes of specific words. When I was making one for the Star Spangled Banner I had to go in and actually delete the word “O’er” because “ER” was showing up huge in my picture. Another thing I don’t really think is useful with Tagxedo is that it is difficult to choose your own color scheme. While there are many pre-set color schemes, there definitely wasn’t what I wanted, which was your basic red, white, and blue. So I had to go in and put in the code for the colors, which took me a few times to get it right even with a code table I got off of Google Search.

It is a pretty cool tool for social studies. For example, I could upload a picture of George Washington and have the text be one of his speeches. I think it could be used to get students interested in a topic and they could also make tagxedos out of something they’ve written. The choices are limitless as to what you can make out of Tagxedo and I love that. Below is a taxedo I made using the pre-set picture of America and the Star Spangled Banner. I input my own color scheme, which I had to use code. Overall, I liked this tool because it creates a fun visual word cloud to use in the classroom. Anything to spice things up and keep students engaged and interested is wonderful!

Voki

Posted on: June 14, 2012

The other tool I tried out in my class was voki. This is a tool that allows you to create a avatar and put your voice or an automated voice to the avatar. I had never heard about this tool before but I think I have seen things like it while browsing the internet. Who knows, I could have seen a voki before! In class, we learned how to create our own voki. It was a free service, unless you want to pay for an upgrade. But the free tool is very useful. You have the ability to choose from a large selection of customizable settings for you avatar and the voice. I thought this was the best aspect of the tool. Students could have fun creating their own avatar and it is very easy to use.

It is a pretty neat tool to use in the classroom. For social studies, I could make a voki of a famous person and add some important speech or quote they said to it. It would be a good artifact to use to engage the students and keep them interested. I don’t think I would have students create their own voki because they may get distracted with all the different customizations. But, it could be a cool way to get them interested in a famous person. I would most likely use this tool in my class as a way to grab student’s attention at the beginning of a lesson.

I made a fun artifact to this tool…it is a poodle named Princess Fluffy living at Buckingham Palace with the Queen. I was able to put Buckingham Palace in the background, which was neat. There were a lot of background options. Also, I was able to make Princess Fluffy speak (or bark if you speak dog) in a British accent. I just typed what I wanted her to say but I would rather upload my own voice. I don’t know if it is something to do with wordpress or flash player but I was also unable to embed my voki artifact. I have put a picture of it and a link below.

Check out my voki here.

There are so many web 2.0 tools out there now I think it would be impossible to try them all out. But I did try out a pretty good amount during my technology class last Spring. We focused on tools that were useful in the classroom. I only found a few tools that I really thought would work for me, teaching secondary social studies, because I felt like many of the tools were meant for elementary students. I’m still hopeful though that I will learn about more tools that will be wonderful for secondary social studies.

Anyways, one of my favorites was TimeToast. I liked this tool because it allows you to create interactive timelines. Timelines have always been very helpful to me when learning about history but I definitely understand how they can be boring. TimeToast is a wonderful tool to make them more interesting to students. I could use them during a lesson to help students get a grasp on the sequence of events. Also, students could use TimeToast to create timelines as study guides. Below is a timetoast I made about nuclear events. I also really like that when you make one, you can view it in “text view”. I would love to be able to print these out but you are unable to, which is a major weakness of this tool. But, you can take a screenshot of it and then print that. (I had to take a screenshot of my timetoast because it wouldn’t show up when I embedded it. I think it had something to do with flash. But, I included the link so you can see it on the website.)

http://www.timetoast.com/flash/TimelineViewer.swf?passedTimelines=285828

Some other web 2.0 tools I liked are: Pixlr (a wonderful picture editor), Delicious (social bookmarking), and Google Forms (to make quizzes and what not). I look forward to expanding my repertoire of fun and useful web 2.0 tools!

 Google Reader is a great tool for consuming information from blogs and news sites more effectively. I haven’t used this tool before but I have heard of it. I never knew it was this helpful for keeping up with blogs! Since I use pinterest a lot, I am always finding new blogs that I would like to keep up with. But, I normally forget about them and they get lost in my bookmarks bar forever. I really like this Google tool. It reminds me of a “news feed” like on Facebook. But there are a few downsides to Google Reader. I don’t like how the tags work on it. I think it makes the sidebar look unorganized and I could only find how to tag a post at a time. I would rather just organize the blogs by folders (as seen in my screenshot above).

As for using this tool in the classroom, I think it would be great! I could see it being kind of difficult to set up, but I bet my students will be tech savvy. Being a social studies teacher, I really think it’s important for my students to know what is going on in the world. One of my goals is to have my students understand the issues that are going on in their society and be able to discuss these issues. By having them create their own Google Reader, they could follow blogs that would help them learn about and keep up to date with the news. I also really like that if I had my students blog, I could easily check what they are posting. Google Reader makes reading blogs more efficient and I love it!

The first Web 2.0 tool we are encountering in TPTE 586, a education class focusing on Web 2.0, is iGoogle. iGoogle is a startup or mashup. By using a page like iGoogle you can bring in information from numerous other websites onto one page. You can get all the information you want in one place! I haven’t used iGoogle before but I have seen/heard of startpages. Since I started reading blogs and news sites, I’ve mainly used twitter to keep up to date. But, I always miss a lot of information. I think iGoogle is an amazing way to keep up to date on your favorite blogs and news sites. I also learned about RSS feeds. RSS is how the information shows up on iGoogle. I had heard about RSS before but didn’t really know what it was. Now I finally know what the little orange image is on websites!

     Above is a screenshot of my iGoogle page. I added 4 tabs: home, education, tools, and just for fun. Many of the widgets I added were news sources. I also added some games, I especially liked the trivia widget! I think I could use this in the classroom but I don’t know if I would. The only way I can really think it would be useful in a social studies class is for the students to have easy access to news sources. But I wouldn’t have them browsing the news during class time. I think it would be most useful for me to make an iGoogle page that my students could visit on their own time to check out the news. I really like iGoogle but I like it more for personal use than educational use.


Hannah Dudley